Fabric Covered Journal Tutorial
for a
Composition book
Cut piece of light weight cotton batting 17" x 12"
Scraps must be long enough to lay across the batting at a diagonal
These are all 1 1/2" w x 22 - 42 long
You can also sew pieces together to make them long enough
Lay first piece across, at a diagonal, right side up
Second piece goes directly on top of the first piece
right sides together (RST)
Sew 1/4" seam
Press seam open
Next piece goes down other side of the first piece,
sew it down, press open
Press open
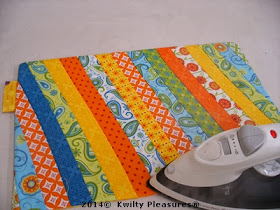
Continue to sew and press building out the entire piece
sewing strips to one side, then the other
Til the entire piece of batting is covered
Flip it over
Trim off the scraps along the batting edges
Flip the piece over for a final trim
Trim to 15 7//8 x 10 3/4"
Now you will need a bit larger scraps or FQs
to make the two inside flaps (and the lining)
Inside flaps measure 13 1/2" x 10 3/4"
Press them wrong sides together (WST)
Top stitch the fold 1/4" for on both flaps
Cut a lining piece 15 7/8" x 10 3/4"
sewed two scrap pieces together, then trimmed, for my lining
Make the ink pen holder tab
Use a 2" x 3" scrap, press the short sides in and
sew down using a scant 1/4" seam
As you look at the journal piece
Lay the tab on the right side, 2" up from the bottom
raw edges all together
this will be the back of the journal when it is all done.
Layer the journal fabrics as follows
Front cover is right side up
Lay the two inside flaps with raw edges to outside
folds are inside near the center
Lay the lining piece wrong side up
Because the composition book has rounded corners....
mark a curved line on the corner for 1/4" seam allowance.
Pin all the layers together securely, all around the piece
and sew 1/4" seam.
Leave a 3" opening to turn the piece inside out.
Check you seams before turning to be sure
all 3 layers are stitched into the seam.
Before turning right side out
trim and clip the curves in the corners
I love to use a plastic chop stick for poking out corners

Press both sides well, including the opening
Top stitch all around the journal cover using a scant 1/4"
I add my Kwilty Pleasures press on label
Insert the book by sliding one side at a time into the flaps
Fold the cover and the book back at the center at needed to
help slide them in.
Add an ink pen and you are all done!
FRONT
INSIDE
BACK


I really love this tutorial and am going to try this. Thank you for sharing. Jeanne
ReplyDeleteThis comment has been removed by the author.
ReplyDeleteHi! It's hard to see in the picture, but what is the size of your composition book? I'm going to make a few of these for Christmas gifts. Thank you!
ReplyDelete