Wednesday, April 18, 2018

I PAINTED A FOREST

I hope you read the post showing
how I made my Painted Forest quilt top.
I used Cotton and Steel Spellbound and Boo 
fabrics for the tree leaves
Grunge tree trunks and limbs
Black filled the background from my stash!

I had passed Vereene Memorial Garden many times 
as I drove around South Carolina!


 I had no idea what would embrace me
beyond the entrance but, 
I knew a there was a chance it that needed my
"Painted Forest" quilt.


Friday, April 13, 2018

DON'T GO INTO THE FOREST!

...unless its my Halloween forest!
This pattern "Painted Forest" is designed by
Scott Hansen at Blue Nickels Studio

Today is Friday the 13th so its a perfect time
to show you a Halloween quilt!

It's full of fun Quirky and Spooky trees made with
Cotton and Steel Spellbound and BOO fabrics!
You will also find a bit of Grunge in the tree trunks.


I was planning my winter hiatus and I needed to cut 
and kit these tree blocks.
Now that is NOT an easy chore!
Look at all the pieces for each block.


There is a Left Side and a Right Side of each tree.
No two trees have the same sections...
The hardest part of this pattern, for me, 
was keeping it all organized
You see, the cutting, layout and sewing instructions are on 
several different pages.
Flipping back and forth to know where I was, or should be,
was insane and made me want to run into a forest
and never come out.

However...she persisted!


I tried everything I could to make it easier.
Sticky notes were everywhere!


Keep in mind...there are two rows of trees.
So the fabrics cannot be the same
SIDE BY SIDE
OR FIRST ROW OVER SECOND ROW

Get where I'm coming from?
I had finished 3 or 4 blocks before I left home.

I took pictures of everything and 
using my iPad "mark up" capability
I wrote numbers on the pictures to keep it all in order. 
and then grouped then with what might be
blocks on first row
blocks on second row


I used Black and white fabrics from my stash
 for the background because...
It's a Halloween quilt and a dark forest is a must!


As I built the blocks I soon realized I needed a place 
to measure them sew I can trim them all to the same size.
  Small condo, sew the kitchen counter had to be my work table
I had a plastic measuring tape and some scotch tape in my
mobile sewing box so I set up this measuring area.
By taping down the tape measure!


Many hours later and lots of patience...
I had the 14 blocks finished and on a design wall !
Looks pretty good!


But trees all in a row????
DO NOT work for me!
So I played and played until I was happy with
this asymmetrical design of the forest!


Now...fill in the background pieces
using the fabric I had with me....
PLEASE let it be enough!
Impromptu technique..building it out, one piece at a time.


BOTTOM Section is more complicated.
I have to build this out on the top and the bottom!


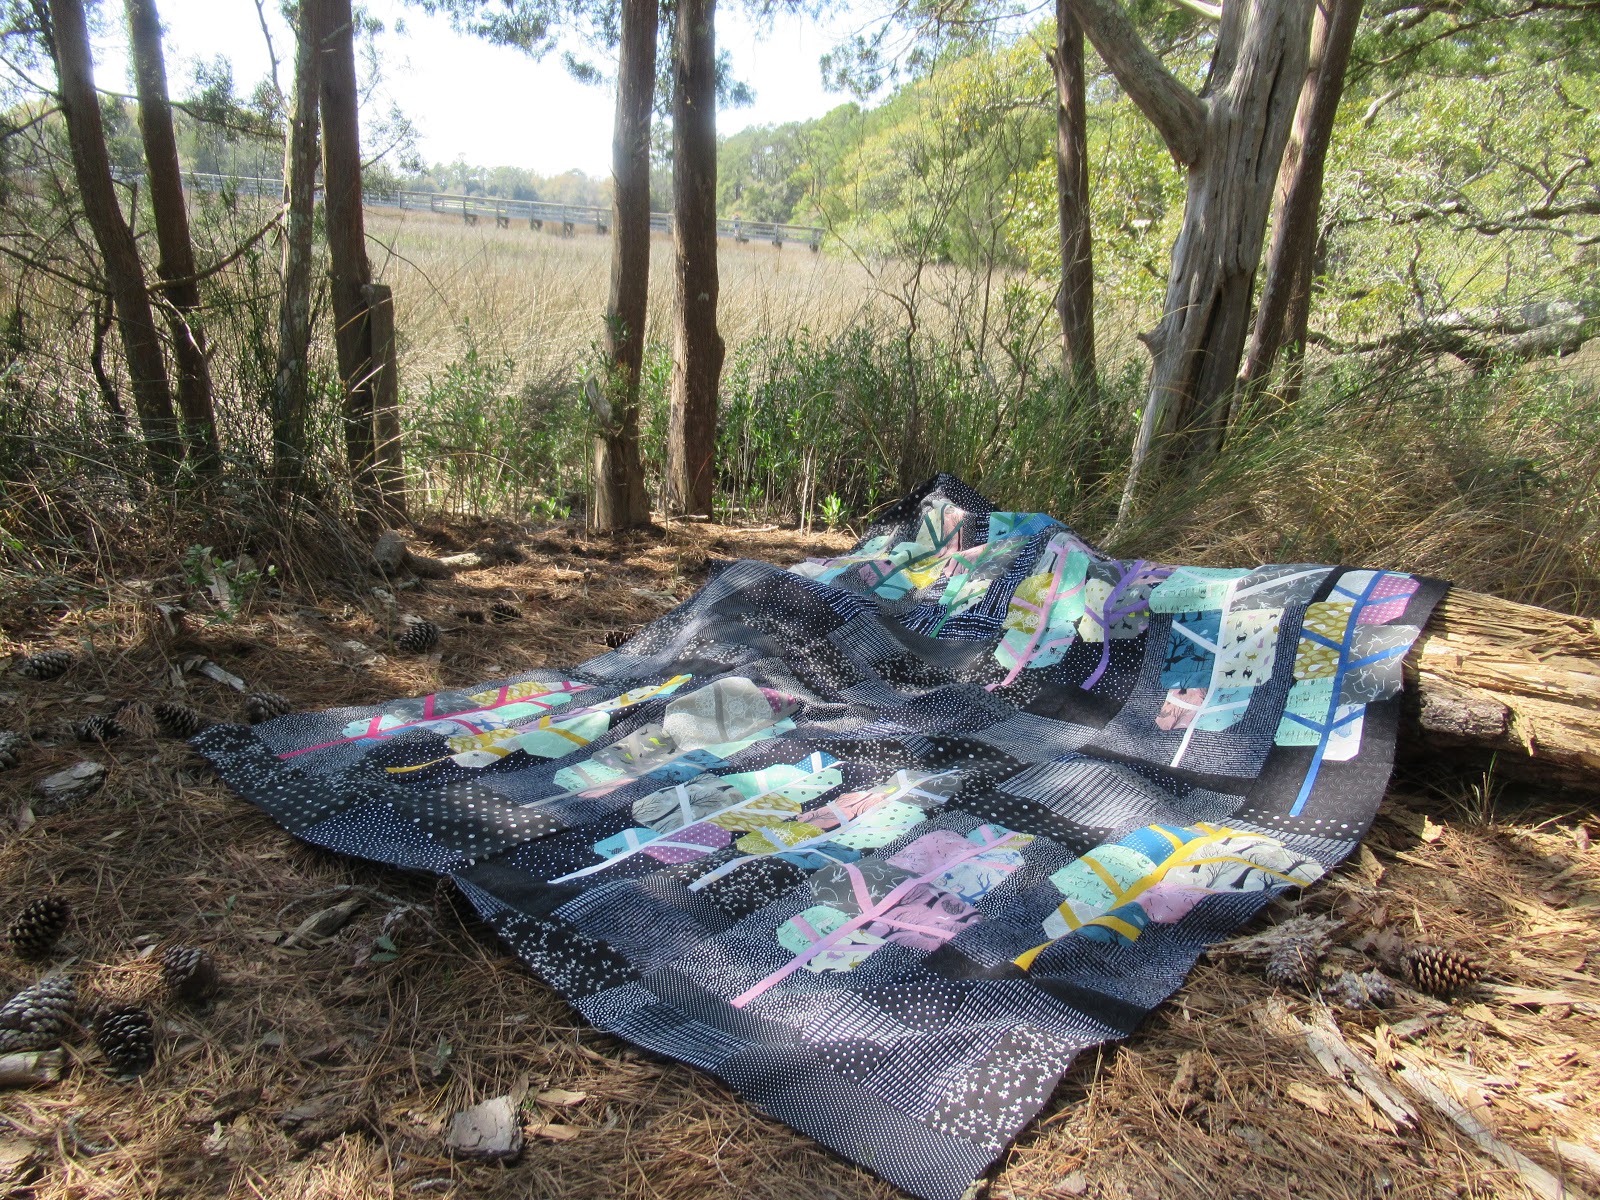
Finally the top is designed and sewn!


The Painted Forest quilt top finished at 57" x 69"
WOW...that's a big forest to get lost in
(or under)

This was the most challenging quilt top I have made
in a very long time.   It was worth every hour I spent on it!
Scott, the pattern designer, even likes it!

When I get home I will...
1) make the backing
2) a quilting design
3) will I quilt it?
4) make a scrappy binding.
Scrappy perhaps?

Stay tuned for a post full of fun pictures 
of My Spooky Painted Forest
in the wild...


Monday, April 2, 2018

TODAY I AM DOUBLE STUFFED!

Thanks for hopping by to see my block for the 
30 days / 30 blocks hop 
hosted by Carla at Creatin' in The Sticks.
I told her I could do any day, any block
Sew today...my block is the..

"Double Stuffed" block

I am on vacation so needed to use scraps I had on hand!
Made me think outside the box because...not that many scraps!

It was a simple block...3 pieces


I didn't want to fall asleep while making this simple block!
I decided scraps can make it more fun and I can make 2 blocks
for my project!

I made "scrappy" centers!


Top and bottom pieces are the same fabrics, but till scraps.


I had enough scraps to make two Double Stuffed blocks.
Laid them out different ways to see what will look
best for my project.

Horizontal 

or Vertical

or how about one each way?


My project is a zipper pouch so I am going with
Horizontal Scraps in the middle of each block.

  I had to piece the lining to make the size of fabric I need.
Remember ...scraps!


My go-to zipper pouch is the Wide Open Zipper Pouch by Noodlehead and you can find her free tutorial here.

Once the 4 pieces are made
I used SFS 101 interfacing for the lining and 
Fusible fleece for the outside fabrics.
 Sew in the zipper.
BUT***This pattern has a unique zipper technique that 
makes this the OPEN WIDE bag that it is!
Details on the tutorial.


For a tighter fitting lining...trim the lining pieces down about 1/4" 
I do this after the zipper is sewn...to make sure all is well and
lined up nicely. 
3/4" seam allowance to sew it all together
(see tutorial for details)


TIPS: I use a jeans needle when making bags.  
For the top stitch I set a straight stitch to at least 3.0 
and use my open toe pressure foot.  
It sits snugly and the inside of the foot/toe
is my guide as I "slowly" stitch all around the bag.
If you have a free arm sewing machine as an option...its a breeze!


And here is my Double Stuffed Block zipper pouch!
It's also my giveaway!


CONTEST CLOSED 
Comment #62 is the winner. 

Leave  a comment and tell me if you like 
Double Stuffed OREO Cookies?
Open to US only (sorry, postage is crazy)
And this bag is yours!


APRIL BLOG HOP


Here's the blogger list for this hop!

Date
Project Designer
Block

April 1st

Block 1- 4 Patch
April 2nd

Block 2 - Double Stuffed
April 3rd

April 4th
Block 4 - Dutch Door

April 5th

April 6th
Block 6 - Tacked Up

April 7th
Block 7 - Stripper

April 8th
Block 8 - Staggered

April 9th
Block 9 - Topsy Turvy

April 10th
Block 10 - Chunky Pinwheel

April 11th
Block 11 - Painted WIndow

April 12th
Block 12 - Broken Cinder Block

April 13th
Block 13 - Reaction

April 14th
Block 14 - Median Strip

April 15th
Block 15 - Center of Attention

April 16th

Block 16 - Bounce
April 17th

Block 17 - Sweet Sixteen
April 18th

Block 18 - Yeah Eights
April 19th

Block 19 - Weave
April 20th

Block 20 - Classic
April 21st

Block 21 - Spot
April 22nd

Block 22 - Cross Walk
April 23rd

Block 23 - Opposites Attract
April 24th

Block 24 - Possibility
April 25th

Block 25 - Camper Window
April 26th

Block 26 - Catching Z's
April 27th

Block 27 - Broken Stripes
April 28th

Block 28 - Stockade
April 29th

Block 29 - Dovetail
April 30th

REMEMBER...
Not all blocks have to be in a quiltt!

ck 30 - Slow Tee