This post is my tutorial on recycling paper calendar pages into envelopes
2014 has arrived and my new year wishes for your are many!
Health, happiness, lots of sewing, all those good things.
Today maybe you will begin the year
with a fun tutorial up-cycling paper.
Turn those beautiful 2013 calendar pages...
...into beautiful envelopes!

2014 has arrived and my new year wishes for your are many!
Health, happiness, lots of sewing, all those good things.
Today maybe you will begin the year
with a fun tutorial up-cycling paper.
Turn those beautiful 2013 calendar pages...
...into beautiful envelopes!
I had this one in my sewing room.
Calendar Page Envelope Tutorial
(12 x 12" or 15 x 12" size works best for this tute)
Calendar Page Envelope Tutorial
(12 x 12" or 15 x 12" size works best for this tute)
Gather the supplies:
a calendar, scissors and glue stick, hole punch, ribbon
a calendar, scissors and glue stick, hole punch, ribbon
Tear off the calendar page
"Ice Cream Cone Kwilt"
Trim each calendar page 11 1/2" w x 8 1/2" tall
I use my paper trimmer but you can
just measure and mark with a ruler and pencil
trim with scissors.
Measure in 3" from the sides and fold to make a crease
Flip the page over so the numbers side is now up
Cut out a notch at the bottom sides of the page
3" x 3/4"
Cut out a notch at the bottom sides of the page
3" x 3/4"
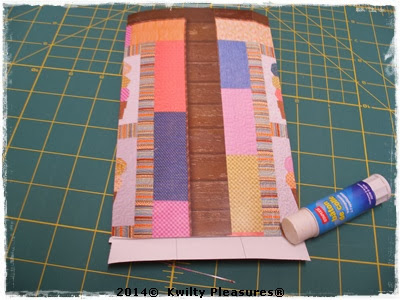
Fold the right side in and run the glue stick down the vertical edge
Fold the left side over the glue bead and press down to secure
Run the glue stick across the bottom flap
Fold it up and press to secure
Fold it up and press to secure
Punch a hole at the center, top of the envelope
Tie it with ribbon, fabric scrap, twine or embroidery thread
The finished size of the envelope is 5 1/2" x 8 1/2"
Great for a small gift, a birthday card...whatever will fit.
I love this dragonfly kwilt calendar page.
And now I have a
"Dragonfly Envelope"
A few scenery envelopes...sorry for the bit of glare here.
but you get the idea!!!
Make a choice to up-cycle your calendars today.
...the envelope please.
Click here to see all my tutorials
A special thanks to "all of you" who have followed my chatter this past year. You have encouraged my creativity
while becoming new blogging friends.
Who knew there would be sew many wonderful opportunities
in blogland to share our creative spirit and passion for fabric!
Looking forward to new adventures in 2014!


That is a really great tutorial, Kathy! I never thought of what to do with all those gorgeous calendar pictures. Thanks for sharing and Happy New Year!
ReplyDeleteWhat a great tutorial...thanks! Happy New Year!
ReplyDeleteI love recycling so this is spot-on. Thanks for a great tut and great idea.
ReplyDeleteVery cool idea!
ReplyDeleteThanks for the great tutorial. I have a beautiful quilt calendar from last year- this would be the perfect way to use it now!
ReplyDeleteGreat Idea - thanks for sharing!!
ReplyDelete